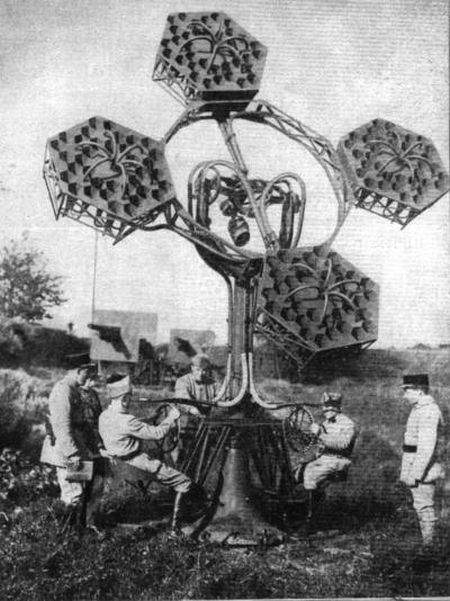
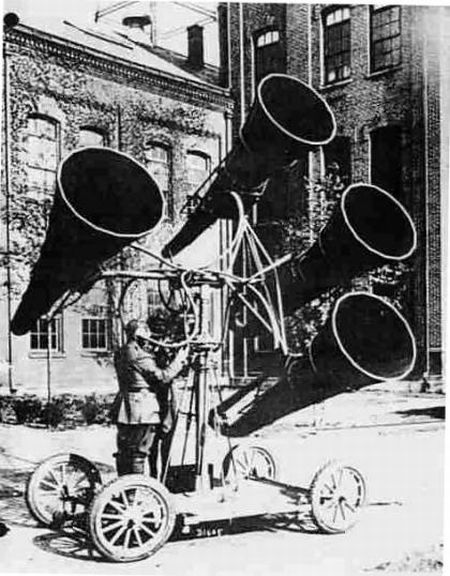
Un bel paio d'orecchie nuove!!!
Non c'è molto da dire, vero? Immagino che a quel
tempo erano a corto di invenzioni
e si sono dovuti accontentare di quel che passava la loro immaginazione.
Allora la domanda giusta è questa:
"Alla luce delle tecnologie che abbiamo
sviluppate oggi e che sono a nostra disposizione,
è plausibile che in così poco tempo abbia avuto luogo un tale balzo evolutivo?
La risposta è naturalmente "No", poiché le scienze in termini di pensiero,
intelletto, concetto e calcolo vengono a svilupparsi da un certo momento in poi,
attraverso percorsi non più lineari, ma arbitrariamente costituiti e ritmati da
flussi non consoni all'evoluzione delle stesse scienze.
Il divario ed il distacco prodotti da immissione indiscriminata di tali
tecnologie e interferenze intrusive attraverso l'immissione di apporti
tecnologici, come pure dedotte da ingegneria inversa, scambiata con chi la
detiene o ce la può fornire, costituiscono una violazione ai trattati di non
interferenza culturale ed evolutiva delle specie planetarie e razze ivi
insediate.
L'inverso, d'altro canto, e cioè la condotta devolutiva di governi che
hanno da sempre gestito il rallentamento e l'introduzione di tali principi e
concetti evolutivi acquisiti, e spesso risolutivi dei problemi che la vita viene
ad affrontare nel lungo percorso evolutivo, sono altresì prova del tentativo di
beneficiare massimamente di tali vantaggi o conoscenze scientifiche attraverso
una condotta omertosa ed iniqua, ingiusta ed egoistica.
Si ringraziano quindi coloro i quali,
esemplarmente, ci hanno fatto comprendere in questi scatti, come si sia passati
da una tecnologia acustica tutta terrestre, ad una, del tutto estranea a questo
pianeta. A buon intenditore poche parole.


This is what I call a futuristic technology!!!
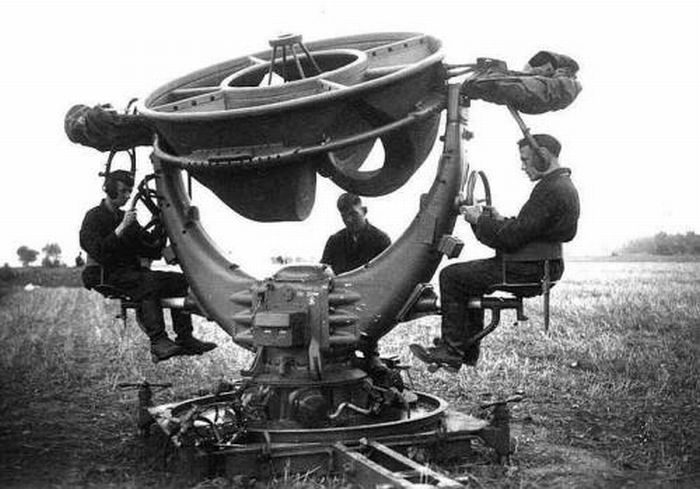
Classified technology.
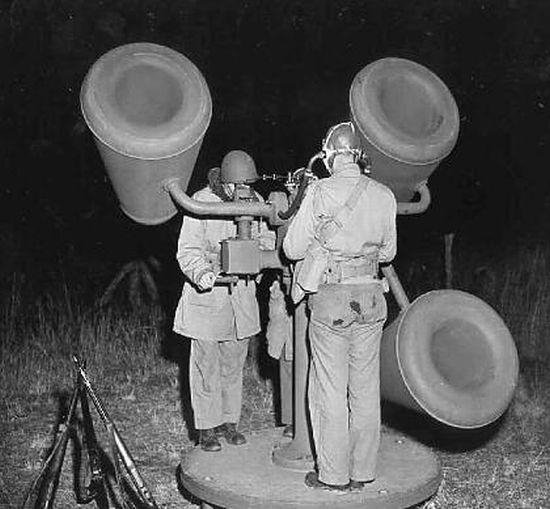
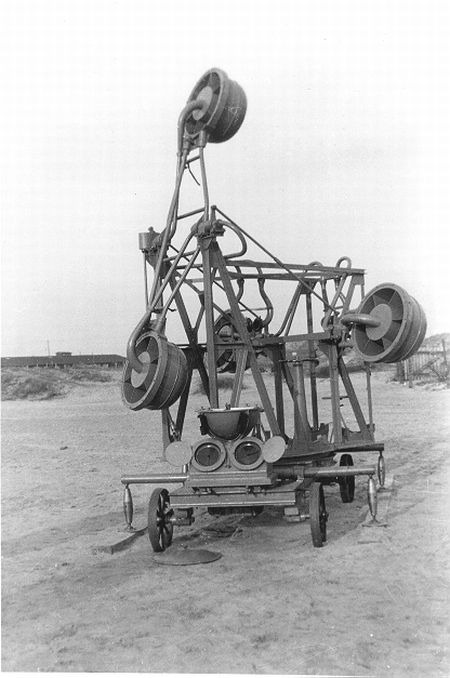
Silence is golden.
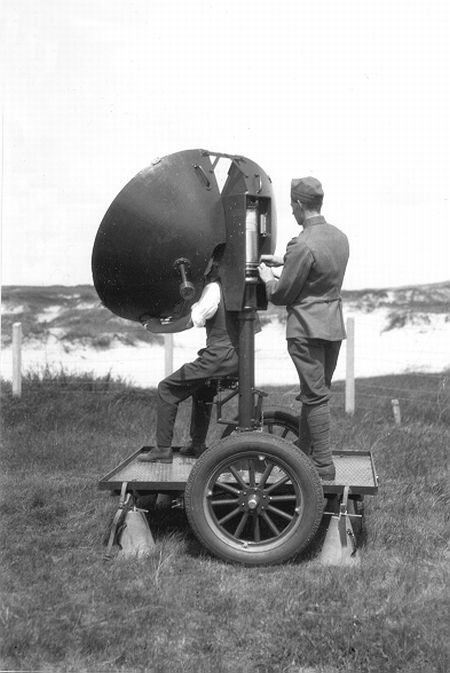
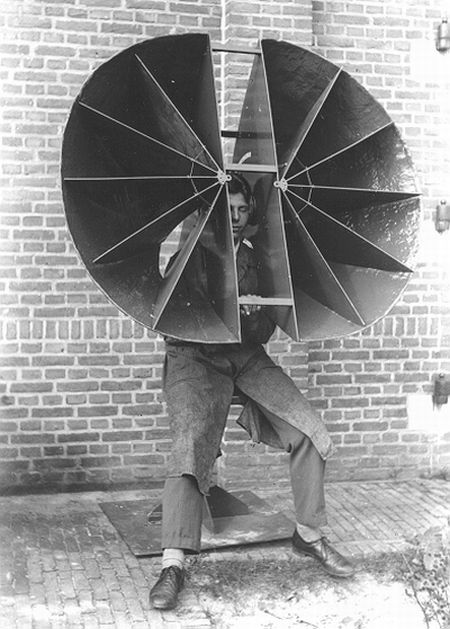
When sound makes the difference.
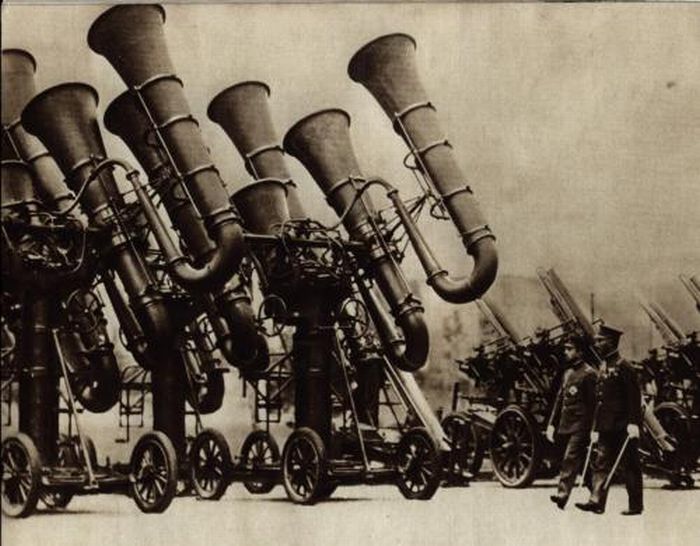
Safe and sound!!!
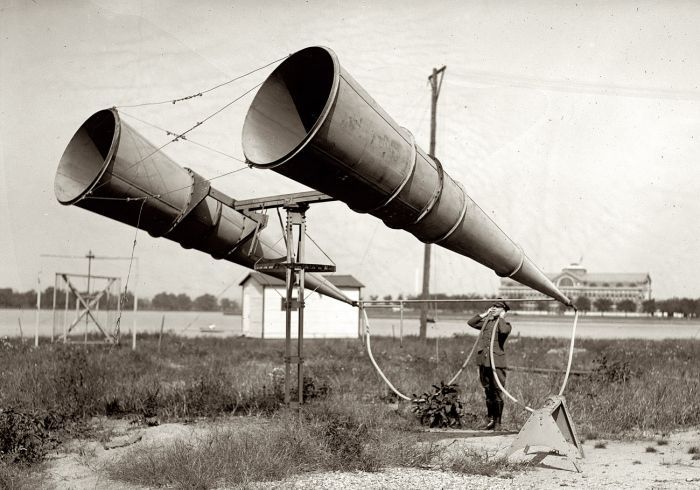
I beg you pardon...????
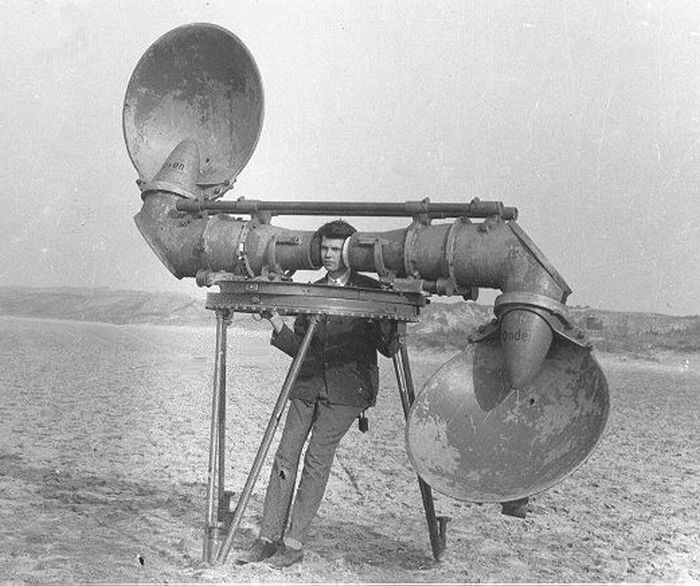
Improved earphone, double axis, but totally wrong concept. This is a binaural device!!!
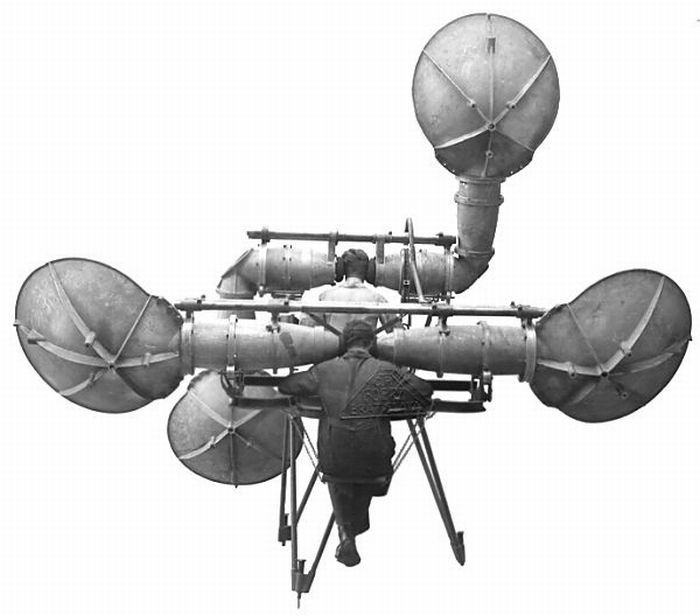
What's the score?
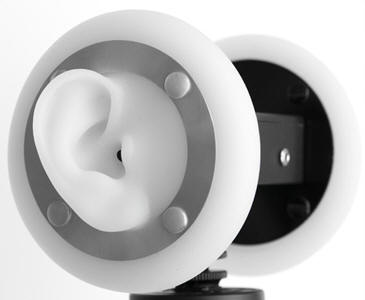
Ora viene il bello!!! Passano 50 anni e questo è lo stato dell'arte, naturalmente dal punto di vista della tecnologia civile a disposizione. Orecchie umane olofoniche di silicone di 3Diosound!!! Grandioso
Però l'idea è interessante e buona. In più funziona
discretamente, anche se andrebbe migliorata.
Il sito è questo se vi interessa.
http://3diosound.com/index.php che riporta le seguenti informazioni per
quanto riguarda gli aspetti tecnici. Lo ricopio qui per semplicità e per coloro
che amano
i libri più di internet, e preferiscono scorrere fra contenuti realtivamente
stabili.
Introduction
The Free Space is an easy to use and highly versatile binaural (3D) microphone.
However, I get a lot of questions from people that do not understand what it is,
or how it works. So this page is dedicated to educating people about binaural,
and about the Free Space binaural microphone. I try to keep things very simple
and straightforward in an effort to introduce binaural to people who know
nothing about it. So for those of you who are already "in the know", please
don't think that I'm patronizing you...
Binaural essentially means hearing through 2 human ears. The output of the Free
Space is a "stereo" signal because it has two channels (Left/Right). But it is
also a binaural signal because it is sound that has been captured using
realistic human shaped ears. It captures sound just like we hear it with our own
ears. You can record that sound and listen to it later using headphones.
Although the concept of binaural audio is very simple, as with any microphone,
there are recording and mixing techniques that will improve the raw recording. I
want everyone to make great binaural recordings. With these instructions, my
goal is to explain how to get the most out of your Free Space. I will go over
everything from the hardware, to setting up the recording environment, to
actually recording, to the post production work (what to do after you've
captured the 3D sound).
If you are already familiar with audio recording, you will still benefit from
these instructions. Binaural recording is a paradigm shift from traditional
recording practices. With binaural, you are not recording sounds individually.
Binaural recording is about capturing what it "feels" like to be in a 3D place.
Good binaural recordings are best described as giving you the "feeling" of being
somewhere else. Sure, binaural audio is just stereo sound shaped by ears, but
our brains understand the directional details of that sound and tell us that
something is behind us, above us, or right next to our ear. Even if we can't see
it, we can feel it, and we know it's there. Once you get used to thinking about
capturing a 3D environment, as opposed to individual sounds, you will easily be
able to create great binaural recordings.
Please use the links below to jump to any individual section. You can click on
the top link at each section to jump back up here.
Mounting
The Battery
The Power Switch
The Bass Roll-Off Switch
The Output
Video Cameras
External Audio Recorders
Studio Recording
Phantom Power
Equal Left/Right Gain Balance
Adjusting the Input Audio Gain
Setting Up the Recording Space
Filming Binaural with Close Objects, and the Proximity Effect
Handling Windy Spaces
Using Compression with Binaural Audio
Synchronizing Video and Binaural Audio
Post Processing Binaural Audio
Binaural Audio File Formats
Director's Comments on "Jeff's Top 8 Favorite Things"

Mounting - top
The Free Space was designed to be as universally camera-mountable as possible.
It has a rugged steel cold shoe mount that has a fixed alignment to the
microphone. I chose to use the most heavy duty mounting hardware I could find,
so that when you mount it in your video camera hot-shoe, or carry it on a grip
handle, it will be rock solid and quiet. There is a 1/4"-20 female thread in the
bottom of the cold shoe for attaching to a grip handle or a tripod.
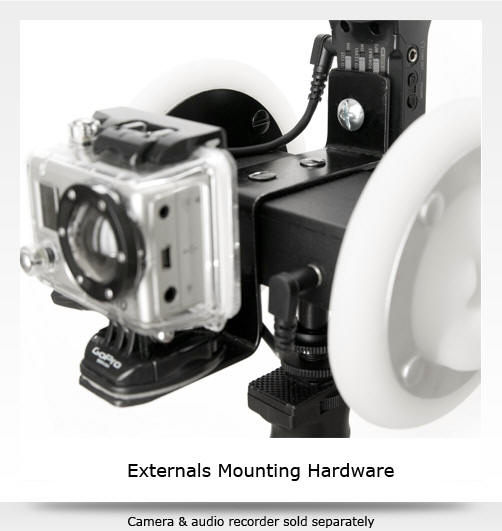
You can also use the Externals Mounting Hardware to mount small video cameras
and external audio recorders to the Free Space for a portable 3D capture
solution.
Both the grip handle and the Externals Mounting Hardware are user-removable, so
you can use the Free Space as a standalone binaural microphone.
The Battery - top
The mic capsules are powered by a 9 Volt battery and a simple circuit. The
battery can be accessed by unscrewing the four screws on the top of the
microphone. The Free Space should operate for a year or longer on a single fresh
9 Volt battery, assuming you turn off the power when you are not using it. You'll
know when the battery is dead when your mic signal gets very weak.
The Power Switch - top
If you don't know what this does, please stop reading, close the browser, and
wait for further instructions...
The Bass Roll-Off Switch - top
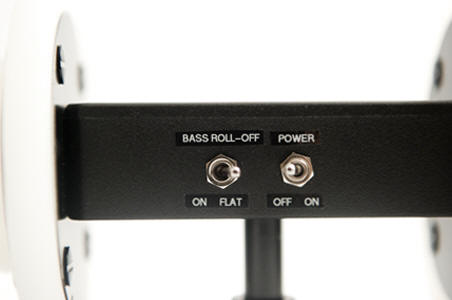
The Bass Roll-Off switch is used for two things. The first is to prevent loud
sounds from overloading the microphone capsules themselves. This does not
necessarily mean only bass-heavy sounds. Most loud sounds contain enough low
frequency energy to overload the microphone, even if you wouldn't expect it. The
second function of the switch is for cutting out wind noise when outdoors.
The general rule of thumb is to switch the Bass Roll-Off to "Flat" for any
delicate studio recording, or indoor, "conversation" level sound environments.
If you are recording outdoors, driving in the car, or recording loud or bassy
sounds such as a drum set or an electric bass guitar, you will want to have the
Bass Roll-Off switch set to "On". It's best to play it safe and turn it on by
default, unless you know for sure that you won't record anything loud. Don't
worry about cutting out the bass. The bass is still there, but it's just
suppressed to avoid mic overload. We will discuss how to retrieve the lower
frequencies when we get to Post Production techniques. The important thing is to
capture a clean recording without overloading the mic, as this could ruin an
otherwise perfect binaural recording.
The Output - top
The Free Space does not record audio within the microphone itself. It is just a
microphone. You must record the output of the Free Space into an external audio
recorder of some kind. This could be a video camera (external mic input), or a
dedicated digital audio recorder, or you can plug it directly into a recording
studio pre-amp or mixing board.
The output is a standard mic level stereo 1/8" jack. Every Free Space ships with
an 8 inch, 1/8" male-male stereo patch cable for plug & play connection to your
camera or audio recorder. If you are going to do studio recording and/or are
running long cables to the recording device, it is best if you get a 1/8" (male)
stereo to dual XLR adapter cable like this one: click
Video Cameras - top
For using the Free Space with your video camera, you must make sure that it has
a STEREO external microphone input. Check your camera's instruction manual to
see how to adjust the input gain, and how to make the physical connection.
Depending on your particular camera, you may need an adapter of some kind. In
most cases, you will be able to plug in the included patch cable and immediately
start filming with binaural.
NOTE: It is extremely convenient, and incredibly cool to film binaural video
with the Free Space directly plugged in to the camera. However, video cameras
generally do not have a "professional" grade audio pre-amp in them. You will
typically get a slight amount of self noise from the camera on the audio
recording. For making home movies of the kids, or for casual filming, this is
not really a problem. The binaural effect is still very impressive, and you tend
to forget or ignore the noise after a while. The convenience of it is just too
good for most "fun" situations, so I use the camera input quite a bit. Just for
reference, my "Chasing Balloons" video below was shot using the Free Space
plugged directly into the GoPro Hero 2.
External Audio Recorders - top
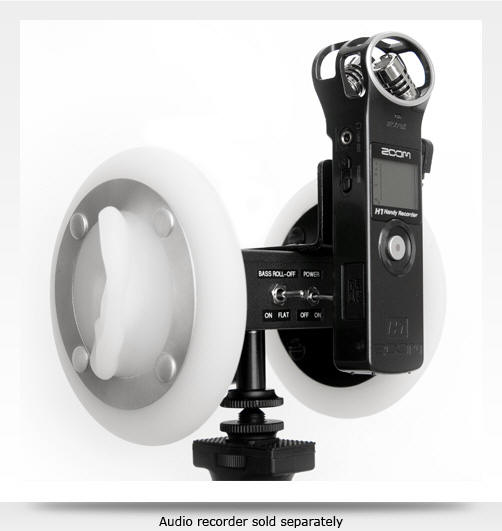
The best way to achieve portable professional level binaural is to use a high
quality stereo audio recorder. Luckily, you can get one for only $99. I use the
Zoom H1 shown below:
The H1 can record 24bit/96kHz (studio quality dynamics), and it's self noise is
very low. There are many other options out there with various features (and
various self-noise levels). The only requirements for compatibility with the
Free Space are that your recorder must be able to record an external stereo
signal, and it must have an input gain control to allow you to adjust the
recording level. I discuss gain control further down.
It is also important that your audio recorder does not have any sort of
automatic gain control or compression applied to the signal. You want to record
the raw output of the Free Space.
NOTE: When you shoot video and record the binaural audio to an external audio
recorder, you will have to manually synchronize the audio and video in a video
editor on your computer. I also discuss this further down.
Studio Recording - top
The Free Space really shines when you plug it in to a studio quality pre-amp!
You can achieve a much higher signal to noise ratio because the prosumer and
professional pre-amps are very quiet. This allows you to capture very delicate
3D audio. Of course the quality will vary between various pre-amps and A/D
interfaces, but that's another discussion.
Phantom Power - top
Many audio recorders and pre-amps provide some kind of phantom power, which is
designed to provide power to microphones that are not self powered. The Free
Space is self powered, so you do not need phantom power. In addition, phantom
power is a DC voltage, which will not harm the Free Space, so you don't even
need to worry about it (it has capacitors in the circuit which block DC voltage
from getting in).
Equal Left/Right Balance - top
When working with binaural recordings, its important to maintain equal gain or
volume control for both the left and right channels throughout the entire
recording, editing, and playback process. When using individual pre-amps for the
left and right channels, take care to balance the gains as closely as you can to
make sure the 3D audio image is not pushed off center.
Adjusting the Audio Input Gain - top
Most video camera audio inputs and stereo audio recorders have an input audio
gain control. This is an important thing to fully understand. When recording the
trains for my Top 8 Favorite Sounds video, I had initially set the input gain of
the H1 down to around 60 (out of 100). The first train went by and totally
destroyed the sound. I thought that I was going to have to re-think my entire
design! That is, until I realized that it was the recorder that was maxing out,
and not the mics. I brought the input gain down to 30 and recorded the next
train going by. I can tell you subjectively that when that train went by and
sounded the horn, it was physically painful to my own ears. I thought for sure
that the mics would have peaked. However, the recording was clear and
undistorted, and I ended up using footage from that second train for the final
video.
You should always watch your audio signal level in the field, especially during
the loudest sounds you intend to record. Bring the input gain level down as low
as needed to handle those loud sounds. You can fix the overall low volume later,
so relax. The only important thing you need to remember is that the further you
turn it down, the more noise you will get in the final product.
To summarize, you want to set the input gain for as strong of a signal as
possible, but without maxing out the recorder's pre-amp. You can find the ideal
volume level by using the loudest sound as your reference point, and bring the
gain down a few notches below that.
Setting Up the Recording Space - top
Recording binaural means capturing what it "feels like" to be in a 3D space. If
you're recording in a tile bathroom for some reason, its going to be very
echo-ey and difficult to distinguish the exact location of sound sources. If you
are in a living room, the carpet and soft furniture will dampen the sound
bouncing around the room, and it will be easier to distinguish the 3D location
of sounds. Plus it will sound like you're actually in a living room. If you are
outdoors, sounds will be very "open" and easy to localize. This is because the
space outdoors is similar to an anechoic chamber (no reverberation of sound),
unless you're next to a wall or other object.
When setting up an environment for recording binaural, you also have to think
about the entirety of sounds and noises that are going to be captured. You have
to eliminate unwanted noises, such as yourself breathing next to the ears (unless
that's the desired effect;-). You might also want to turn off noise makers such
as external hard drives, computers, kids, and your smart phone, etc...
It all becomes pretty obvious if you listen through the Free Space with
headphones before pressing record. This can be done on some external audio
recorders (like the Zoom H1) that have a headphone jack. It's always a good
practice to listen through the mic before recording anyway.
Depending on your desired effect, you can also control the sonic characteristics
of a room. If you can afford it, invest in some high density foam, which can be
placed around a noisy room to dampen the sound. If you can't afford the foam,
use blankets and/or pillows.
It's also important to think about microphone location. Placing the Free Space
next to a wall will result in the feeling that there is a wall next to you. This
is because your brain picks up on the part of the incoming sound that is
bouncing off of the wall, and is able to identify it as a large flat surface,
even though you can't see it. This is a very under-used, yet incredibly powerful
ability that humans have with their ears and brains. Some blind people can
actually identify the size, shape, and even the material of an object, just by
listening to the way it reflects sound! That's even better than using sight!
They aren't fooled by foam rocks in your yard...
So pay attention to every detail of the entire 3D space being recorded,
including all sounds and noises, the room acoustics, and the location of the
microphone, and you will be able to maximize the quality of your end product.
Filming Binaural with Close Objects, and the Proximity Effect - top
The Free Space is excellent for capturing what it feels like to be close to
objects. Distinct sounds that are located close to the microphone (less than 5
feet), have the tendency to give you chills! This is because the 3D sound is
telling your brain that something is approaching you, and you might not even be
able to see it! It feels so real, that your body's fight or flight response is
uncontrollable, especially if the content is convincing. That's why people's
first thought after hearing binaural is that it would be great to use binaural
to scare the crap out of other people!
The feeling of sounds being close to you is what I think of as the binaural
proximity effect. With traditional microphones, you also get a proximity effect,
but that has more to do with the way the microphone responds to close sounds vs.
distant sounds. With the Free Space binaural microphone, the binaural proximity
effect has more to do with the 3D image than mic performance. The feeling of
being close to sounds with binaural audio is a highly desirable characteristic
in many cases, simply because it emphasizes the 3D human experience of "being"
somewhere else (out of body). However, when you add video to the binaural, some
camera lenses distort the visual sense of proximity to the object in the frame.
Therefore, if you plan to film binaural video of close proximity objects, you
have to think about the type of camera and lens you're going to use.
DSLRs with long focal length lenses are amazing for filming binaural video. They
give you HD video with a narrow depth of field (blurry in the background), which
only adds to the 3D experience. However, for filming close objects, such as a
musician performing, or for ASMR videos, you will want to consider using a wider
angle lens. Fish-eye lenses work very well for point-of-view (POV) binaural
video of close objects. This is because the image you see more closely matches
the relative distance of what you are hearing.
For filming close objects with a longer focal length lens, such as 50mm and
greater, you may have to physically back away from the object to get everything
to fit in the frame. If you're filming a person playing guitar, you will have to
move the camera back 5-10 feet to fit them in the frame. The problem with this
is that the video will look like you are just 3 feet from the person, but if the
microphone is on the camera, the 3D audio will be telling your brain that you
are 5-10 feet away. This is potentially a big problem for binaural when
synchronized with video. It could be confusing for the viewer to have such a
discrepancy in perceived distances. You can make up for this a bit using
compression (discussed later), or you can take the mic off the camera and move
it closer to the object of focus while keeping it pointed in the same direction
(and out of view).
Handling Windy Spaces - top
Wind is a big problem for binaural. When wind hits the microphone capsules it
produces all kinds of unwanted noise, especially in the low end frequencies.
There are two weapons available to take care of wind completely. The first is
the bass roll-off filter, which I already mentioned. Turn it on any time you
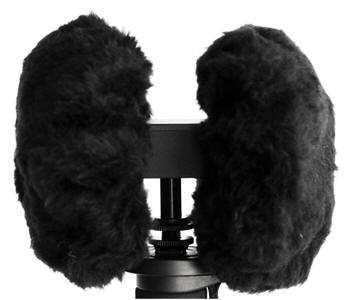
anticipate even the slightest amount of wind. The second weapon available is a
pair of the Windy Space Muffs. These muffs will eliminate all wind at lower wind
speeds, and will sound completely realistic at higher wind speeds. I've even
boosted the low end EQ around 60-80Hz in one video just to bring out more of the
low end wind noise! These things are the ultimate solution for wind with the
Free Space, and they are a must have for any field recording.
Using Compression With Binaural Audio - top
If you know what compression is, you can skip this paragraph. Compression is a
tool that audio engineers use to control sound, and is typically applied in
"post", which means after the audio is recorded. It is either a software
plug-in, or an external hardware compressor. Compression boosts the volume of
quiet sounds, while limiting the volume of the loud sounds. Compression allows
you to bring out a lot of the detail of a recording (quieter parts), and make it
sound bigger and more full. Basically every radio station, music album, and TV
show use compression extensively to finely balance all the sounds so that
nothing gets drowned out.
Compression is a very valuable tool for binaural. Many people say to avoid it
completely, but I disagree. The argument to avoid it comes from the idea that
for binaural, you really want the full dynamic range of the sound to remain
intact. This means that you would just need to turn up your volume when you're
listening back so that the loudest sounds would be just as loud as they actually
were at the time, relative to the quiet sounds. I would agree that in an ideal
world, this would absolutely be true. But we don't live in an ideal world. We
live in a world with an ongoing "volume war" over music and TV and every other
media we produce. Because of this, people who do not know that they should turn
it up, will not have a good listening experience. But beyond that, there are
other benefits for using compression with binaural.
When you apply compression to binaural audio, the resulting effect is that
objects appear to sound closer than they really are. This is because the quiet,
distant sounds are now boosted in volume, and our brains interpret that as being
closer. This "proximity distortion" sounds like a problem, but the effect only
becomes a negative one if you over-use it. You can use it to your advantage in
situations where you want things to sound closer, like I mentioned above with a
long focal length DSLR camera lens. But overall, using just enough compression
to boost the overall presence of a binaural recording without distorting it will
result in a much more immersive listening experience.
I will discuss how to actually use compression in the post processing section.
Synchronizing Video and Binaural Audio - top
When you plug the Free Space directly in to your video camera's external
microphone input, the binaural audio is automatically recorded in perfect
synchronism with the video. This is great, and very nice for casual binaural
video! But as I mentioned above, if you want higher quality audio, you may
choose to use an external audio recorder to capture the sound. When you do this,
you must then manually synchronize the binaural audio to the video. You can do
this on your computer using any standard video editing software. There are many
choices for software, but the minimum requirement is that it must be able to
handle multiple tracks of audio, so that you can see/hear the camera's built in
microphone audio, at the same time as the audio captured from the Free Space. If
you don't have any camera audio, you can snap your fingers in front of the
camera before shooting the scene and carefully align the audio to that.
If you do have an audio track from the camera, you can use that as a reference
for aligning the binaural audio. All you do is zoom in on the audio tracks, and
align the peaks and valleys as closely as possible. You should really get down
to the frame level and get it as perfectly aligned as your software will let you.
Our brains are sensitive enough to detect even a half of a frame discrepancy in
synchronization. Once it's aligned, don't forget to mute or delete the camera's
audio track. You'll realize it later if you don't, because the sound will not be
binaural anymore with the other audio playing.
In case you're wondering about available video editing software packages, I have
successfully used Final Cut Express, Sony Vegas Pro, and iMovie to synchronize
binaural video, but nearly every other software editor will work as well.
Post Processing Binaural Audio - top
I've talked a lot about "post", so here it is. Post production is what you do
with video and audio after it's been recorded in raw form. I will leave video
post production out of this and focus just on the binaural audio. It applies for
both video and audio editors.
There is not much you need to do to binaural to polish it up. The great thing
about it is just how good binaural sounds straight out of the microphone.
However, when you want to present a recording or a video of many different
sounds recorded in different places at varying sound levels, it's important to "balance"
everything out for a nice consistent sound. In post, the goal is also to improve
the raw recordings by bringing out the best of the tracks.
One of the most important items to cover in post is the low end. Whether or not
you recorded with the bass roll-off filter turned on, you should pay attention
to the low end when mixing. You should try to balance the low end so that it's
neither lacking, nor too strong. You should be able to feel the low end as
naturally as you would if you were using your own ears. A binaural track that is
lacking low end feels weak and thin. But a heavy low end is very distracting and
unnatural sounding.
We are talking about cutting or boosting frequencies below about 200 Hz, so the
tool of choice is a low shelf filter. I set the "knee point" of my low shelf
filter to around 200 Hz and either increase or decrease the gain. As a point of
reference, if you recorded using the Free Space with the bass roll-off filter
turned on, a gain of about +9dB at this knee point will approximately recover
the low end.
It is also good to use compression in post to make the binaural experience more
"lively". I currently use Final Cut Express to edit my binaural videos. FCE has
a "Dynamics Processor" audio effect, which is a compressor/limiter. Most of the
time, I will use the default settings of the dynamics processor and only adjust
the gain setting, but I also turn on the limiter function, just to avoid peaking
beyond 0dB (the maximum). You can adjust the other settings if you know what you
are doing, but for the average person, the default settings in most audio
compression plug-ins will work fine.
What you want to do with compression is to find the loudest part of your
recording and adjust the gain based on that. Push the gain up as far as you can
until the loudest part of the recording begins to sound unnatural. Then you can
bring it down a few dB, and back into a "natural" level. The rest of the track
should appear much louder and more lively now, but will retain full 3D
localization. It's helpful if your compressor plug-in has a visual meter to
indicate that the compressor is in action. This way you can see exactly how many
dB you are squishing.
The only other setting I adjust occassionally with compression is the "threshold"
setting. This setting tells the compressor what the cutoff volume level is for
any sound that will be compressed. So any sounds that are at a higher volume
than the threshold setting will be limited (squished), and anything below that
level will be boosted by the gain setting. If this is set at 0dB, then nothing
will get compressed. You generally will bring this down to -6dB for moderate or
-12dB for strong compression. Here is a great link for an overview on
compression: click me
NOTE: Make sure NOT to decouple a stereo compressor such that each channel is
compressed individually. Both channels should be compressed together.
Independent left/right compressors will ruin the binaural effect.
Binaural Audio File Formats - top
Let me clear up a potentially confusing term, "Compression". We already spoke
about using a compression tool to condition your binaural recordings for a full
and balanced signal. Now I'm going to talk about compressed and uncompressed
file formats. This is completely different than the compressor tool in the
studio.
Compressed audio files like MP3 files, are "compressed" in the sense that the
file size is smaller. They accomplish this by removing some of the higher
frequencies that we are less likely to notice missing. They also reduce the
dynamics of the sound. This means that compressed audio will have less impact
for strong sounds, and will also lose some of it's pristine higher end "bling".
For binaural, the lower the file compression quality, the worse the 3D effect
will be.
Binaural audio is best recorded and manipulated using an uncompressed file
format such as WAV or AIFF. These file formats preserve the entire frequency
spectrum and all of the dynamic detail of the signal. When recording and doing
all of your post production work, you should always use an uncompressed file
format. You want the EQ and audio compression (studio tool) to act upon the
highest resolution signal possible. I always work with WAV files at
24bits/sample and 96kHz sample rate. It is commonly referred to as simply
24/96k.
That being said, you can mix down to a compressed file format for the final mix.
Compressed file formats include MP3, AAC, and OGG, along with several others.
All of these will work fine for the final mix as long as you use a high bit
rate. I generally use the highest available quality settings for compressed file
formats. When uploading a binaural video to YouTube or other video site, they
will do additional file compression, which will result in further loss of
quality, so it's important that you start with the highest available quality.
----------------------------------------
Director's Comments on Jeff's Top 8 Favorite Sounds - top
Below are the "director's comments" about how I filmed and edited each clip of
this video, so that you can understand everything that went into them to make
them sound so good! I'm telling you that it honestly doesn't take much to make
the raw Free Space recordings sound good... In fact, one of the clips is
completely raw, straight out of the Free Space binaural microphone!
Jeff's Top 8 Favorite Sounds:
For all shots, I had the GoPro Hero 2, and a Zoom H1 mounted on the Externals
Mounting Hardware bracket, along with the either the grip handle option or a
tripod/monopod.
#8 Babies: For this shot I had the bass roll-off set to "FLAT" because this is
an indoor, and fairly predictable audio environment. I adjusted the audio input
gain on the H1 to around 75 (out of 100).
This clip is intended to show how easy it is to capture the memories you will
cherish for the rest of your life. Of course, using the H1 to capture the audio
requires synchronizing the audio to the video in post. If I were capturing this
moment with my own kids, I would've gone directly into the GoPro. That way, I
could just plug it in to my computer and instantly watch perfectly synchronized
video with binaural audio! The audio quality of the GoPro is definitely good
enough for personal binaural enjoyment!
I added a moderate amount of compression in post to boost the overall liveliness
and presence. Click here to learn how to process your own binaural audio in
post.
#7 Driving On Top of the Car: This was an interesting one! I had the Windy Space
Muffs on (obviously). This shot is intended to demonstrate the EXTREME
awesomeness of the Free Space! I turned the input gain on the H1 down to around
40 for this one, just to make sure I avoided clipping. I made up for it in post
with some gain and fairly intense compression. I had to use more compression on
this track just because of the dynamic range that I wanted to draw out of the
track. The loud peaks on the freeway make this a little tricky. But you just
need to push the compression until it starts to sound unnatural, and then ease
off a bit.
I had the bass roll-off filter turned on during the recording. I boosted the low
end EQ in post using a low shelf filter to bring out more of the real "boominess"
we hear from wind in our own ears. I also controlled the tone of the wind to
make it more pleasing and less distracting. I did this by using a band pass
filter at 1500Hz to pull down the mid frequencies by -3dB. In addition, I also
boosted things by +6dB around 3kHz to bring out more of the directional details
that were competing with the wind noise (lower-mid frequencies).
This clip really demonstrates the "feeling" that binaural audio gives you. It's
all about how you "feel" like you are really on top of a car. This is
accentuated when the video suddenly switches to a very peaceful place (parked
car in the rain). If you are fully immersed in the video, you will feel the
adrenaline in your body go up on the freeway, and then drain away as you calm
down in the parked car. This adrenaline is your body's natural response to
feeling like you are actually in a dangerous location.
#6 In a Parked Car In the Rain: This one was easy! Bass roll-off turned to "FLAT",
moderate compression to make it more lively. That's about it. The only thing to
note is that closing a car door while recording inside the car can cause the
microphones to clip. This is due to the spike in pressure. If you must close/slam
a door for your project, try opening the window a bit to relieve the pressure.
#5 The Beach For the beach scene, you're just hearing the raw audio without EQ
or compression. All I did was adjust the gain to match the other clips.
#4 Freight Trains This train was extremely loud! I turned the input gain on the
H1 down to around 30 (out of 100) to avoid clipping. The Free Space can handle
these loud sounds just fine, as long as you control the signal on your pre-amp/recorder.
On this clip, I boosted the low end in post (< 200Hz) to make up for having the
bass roll-off turned "ON", which is necessary for all loud sounds, BTW. I also
specifically boosted the "boomy" low frequencies around 60hZ by about +3 dB to
give the train more apparent weight with the sound. Those low frequencies add to
the sense of realism, since you would normally feel them in your chest. The
ideal setup for binaural is to add a sub-woofer to the system to give your
entire body the presence of low frequencies, but that's for the future...
#3 Balloons I did the balloons to demonstrate an uncomfortable sound (not sure
why;-). I had the bass roll-off turned "ON" for the balloons. I used a low shelf
filter at 200Hz and 12dB in post to recover the low end. I also have some fairly
strong compression applied to dampen the pop sounds and to bring out the
reverberation in the room, after the pop. Make sure to use a quick "release"
setting on your compressor in situations like this so that the reverberation
from the room just after the pop sound doesn't get squished along with the pop.
#2 Ping Pong Balls This was a fun clip to record! I blocked the top of the mic
with a make-shift umbrella so that the balls wouldn't hit it. I had the bass
roll-off filter turned on for this clip because, despite their small size, those
ping pong balls make a powerful and sharp sound when they hit concrete. Multiply
that times 71 and it will clip the mics at close range. I made up for this in
post with a +9dB gain on the low shelf filter and the knee at 200hZ. I believe I
had the input gain on the H1 set down to around 50 or so. I applied slight
compression (+3dB gain) to this one, just to bring out the detailed ball rolling
sounds at the end. I brought the compression "threshold" setting down on this
one to -14dB to dampen the peaks caused by the balls bouncing.
People have commented about how quiet this clip is when it comes to self noise.
This is part of why I let the clip trail off so long. It shows you what you
should be able to expect with your own recordings using the same setup. It's all
about controlling the input gain for a strong signal without clipping and using
a good pre-amp or a recorder with a good quality built-in pre-amp.
#1 Summer Rain This clip was an accident! I was trying to capture lightning and
thunder, but I didn't expect to capture a bolt directly in front of the camera
and less than 1200 feet away (I calculated it using the time delay)!
Unfortunately, I had the bass roll-off set to "FLAT" for this one, so the
thunder eventually clipped pretty bad. I actually had to splice out the clipping,
and unfortunately you don't hear the entire thing as it really happened. In
reality, it was an even more amazing thunder experience than what made it to the
video.
I boosted the low end in post on this one to bring out the rumbling of the
thunder. I also have slight compression applied, but with more attention paid to
controlling the peaks of the initial clap, relative to the rest of the thunder
rolling.
Conclusion
Binaural audio is really simple to do, but requires a little understanding and
some post editing if you want to do it well. It takes some practice to get a
scene to sound exactly right. I like to go directly into the GoPro with the
audio when I'm taking practice shots, just for the convenience of automatic
synchronization of video/audio. As far as the post editing stuff, start with EQ
and compression (in that order) in your plug-in chain. Your EQ work will
generally be for controlling the low frequencies. Boosting the gain in your
compressor makes binaural tracks more lively, and I generally always use it. But
it also controls the spikes in the waveform so that you can pump up the gain to
hear the quieter details as well. Just take care not to over-use the compression,
otherwise it will sound unnatural. Just have fun with it! Please feel free to
contact me if you have any questions or problems.
examples
n.b.
Interessante trovata alle quale un cospicuo numero di
ricercatori si è rivolta, dalla testa olofonica, sino a questa sisntesi, che ne
racchiude il principi, anche se
naturalmente siamo allo stesso punto di partenza, e di scienza come di una sua
applicazione consapevole in senso stretto non si può parlare.
Questa è ancora una trovata, "copiata" dalla natura, che non è altro che
intelletto relativo incapace di superare il proprio limite.
La mentalità standard pare dipendere quasi totalmente dalla stessa
configurazione che la sostiene, con la caratteristica di essere antropomorfa.
Qui sarebbe valsa la pena allora di creare degli stampi delle orecchie di
animali capaci di recepire suoni non solo a grande distanza, ma addirittura a
frequenze specifiche
particolari, come fanno alcuni microfoni, unidirezionali, omnidirezionale,
electret, cardioid, o magnetici. Seguite pure il consiglio, ma sappiate che se
non comprenderete il modello
fisico matematico che sottende a queste funzioni ed algoritmi, a poco servirà
procedere in questa maniera a tastoni.
Pare di ritrovarci ancora di fronte a quei tromboni delle prime foto, anche se
la dimensione è portatile. Non mi meraviglierei se qualche scultore in preda
alla megalomania un giorno
creasse in orecchio di silicone di una ventina di metri di altezza. Anche qui
risulta chiara il doppio livello di conoscenza e tecnologia coesistenti.
Copiare la natura dà sempre buoni risultati, specie quando ci si trovi a
confrontarsi con leggi che non si cono comprese o modelli,
strutture, funzioni, processi, che sono un poco più complicati della banale
spiegazione che si da genericamente a questi.
Ad ogni modo, ad una prima occhiata, dato che la grandezza dell'orecchio pare
essere conforme ad un orecchio maschile, si può facilmente evincere che
il tipo di frequenze raccolte avrà proprietà specifiche per l'udito maschile e
sarà carente sulle frequenze che superano i 16.000 Hz
e che in conseguenza del fatto che lo stampo è stato stondato e riconfigurato
per poterlo più facilmente estrarre dal calco o resistere a rottura, lo stesso
lobo, che troviamo in basso,
pare essere conformato non consentendo all'orecchio stesso di calibrare ed
assorbire certune frequenze che dovrebbe invece captare e smorzare. Diciamo
quindi che possiamo accontentarci
di questo orecchio passivo, per quel che riguarda un certo grado di percezione
spaziale che potrà darci in più rispetto ad una membrana semplice
unilineare circolare non inclinata secondo
l'asse timpanico. Va bene, c'e' ancora molto da fare, forse è meglio che mi
fermi qui per ora. Poi si vedrà.
Ad ogni modo quando si afferma che "Your EQ work will generally
be for controlling the low frequencies, o "boosting the gain in your compressor
makes binaural tracks more lively"
ciò significa che avremmo modificato il tipo di segnale in entrata dandogli
caratteristiche completamente diverse ed arbitrarie secondo il nostro gusto. In
natura ciò significherebbe non solo
riconfigurare l'orecchio fisicamente, deformandolo, ma anche variarne la densità
specifica, che purtroppo qui è di un solo materiale, e quindi apparentemente
confacente allo scopo prefissato.
Esistono parametri che non sono stati considerati affatto, come la consistenza o
la sola idea di inserire nel calcolo o porre attenzione a quello che sarà il
formato del file, che fa capire subito
come il fascino della natura e del tentativo da parte dell'uomo di copiarla,
andrà a perdersi in conseguenza di atteggiamenti privi di natura inerente, ma
solo culturali e di comodo.
Al di la del fatto che quindi una certa forma sia stata copiata, non si è stati
capaci di andare al di la del dettaglio e della configurazione apparente
relativa.
Affermare quindi che quanto si possa registrare con un paio di orecchie del
genere possa produrre l'impressione di una registrazione binaurale in 3d, e cosa
vera solo in parte.
Quello che poi successivamente verrà trascritto a seconda del codec, che in modo
arbitrariamente digitalizzato eseguirà operazioni di distruzione o scramblamento
delle frequenze,
con taglio di frequenza, fase, campionamento, e quant'altro, dovuto al tipo di
protocolli in voga al momento, ogg, aiff, wav, mp3, ecc... inserirà ancora un
livello di imponderabilità
casuale o meno, che non potrà che produrre un peggioramento delle cose, e cosa
ancora più triste, nulla si dice dei due microfoni a condensatore elettrico
alimentati dalla batteria a nove volt,
e della loro sensibilità, posizione spaziale, grandezza, ecc... cosa alquanto
deludente, se si dovesse tenere conto anche qui di quello che la natura ha
fatto. Ho personalmente registrato a valori
di campionamento tali, da sorridere al 24/96k. Stimo registrazioni a 32/768k un
avanzamento apprezzabile nella cosa, ma rimango dell'idea che i procedimenti di
registrazione sonora per
questo tipo di apparecchi dovrebbero essere effettuati con apparecchiature e
tecnologia analogica non limitata a circuiti predisposti per il taglio 20/20000
dei wav.
Il piano armonico andrebbe a perdersi completamente, e con esso le informazioni
estremamente rapide contenute nella ratio naturale della pinna dell'orecchio
superiore intercorrelata con i flussi
elettrici inviati ai nervi uditivi e non solo. Rinvierei per questo alla lettura
dell'articolo sul "Neurophone", che si trova fra quelli che ho pubblicato nel
sito, per trovarvi interessanti spunti di ricerca e
di lettura, capaci di far capire meglio la cosa. Per quello che mi riguarda, le
variabili in gioco e le curve, gli algoritmi, le forme e i processi che si
attuano simultaneamente in questo campo, sono tali
da non essere stati né compresi né minimamente concepiti dalla mente limitata di
chi ha provato a fare qualcosa di ingegnoso. Ho già parlato troppo. Vedremo di
migliorare anche questo.
Nel CD intitolato "Sabdha Bhraman", nel quale utilizzai il campionamento
suddetto, ma con un numero di microfoni relativamente maggiore, 6 +1+1 disposti
sui 4 assi, tentai di catturare tutte quelle frequenze che altrimenti sarebbero
andate perdute circa le 240 campane tibetane, nepalesi, bengalesi e orissa che
avevo avute a disposizione per registrare quell'album. Devo dire che anche così,
utilizzando lo stato dell'arte di quanto la tecnologia offriva e boostandolo al
massimo, non sono ancora riuscito a raggiungere quella perfezione uditiva, anche
se ascoltando la registrazione di una coppa, o la coppa stessa, non si riconosce
più quale stia effettivamente suonando ad occhi chiusi. E pensare che avevo
messo le parrucche anche ai microfoni!!! Ognuno fa quello che può. Se scrivo
liberamente di queste cose, è perché resto a disposizione con chiunque voglia
portare avanti la ricerca, a ricercare e scambiare opinioni, circa questi
argomenti, o per eventuali collaborazioni, confidando nello scambio aperto e
reciproco, come nel valore del copyleft intellettuale, e per la condivisione dei
saperi, delle conoscenze e dei principi che potrebbero migliorare il mondo.
by Amonakur